Introduction:
In a world where constant connectivity is crucial, having quick and easy access to your webmail on your iPhone ensures you stay on top of your emails, no matter where you are. This guide will walk you through the straightforward steps to connect your webmail account to your iPhone, enabling you to manage your emails seamlessly on-the-go.
Step 1: Unlock Your iPhone and Open Settings
Begin by unlocking your iPhone and navigating to the “Settings” app. Scroll down to find the “Mail” option.
Step 2: Tap on “Accounts”
Within the “Mail” section of the Settings app, tap on “Accounts.” Here, you’ll find options to add and manage email accounts on your iPhone.
Step 3: Choose “Add Account”
Tap on “Add Account” to initiate the setup process for your webmail account. Depending on your email provider, you may select the relevant option, such as “Google” for Gmail or “Microsoft Exchange” for Outlook.
Step 4: Enter Your Webmail Account Details
Input your full email address and password associated with your webmail account. Tap “Next” to proceed.
Step 5: Choose Account Type
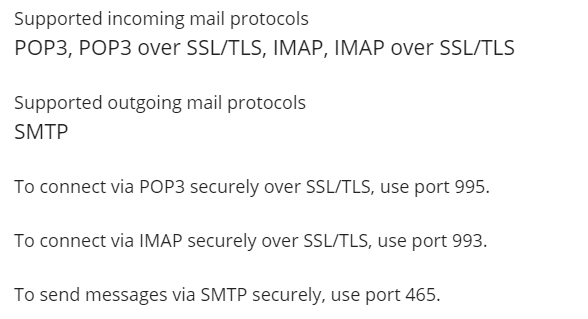
Select the appropriate account type based on your email provider. For most standard email providers, you can choose “IMAP” for synchronized access across multiple devices. However, some providers may require “POP3” or another specific protocol.
Step 6: Configure Incoming and Outgoing Mail Server Settings
Enter the Incoming Mail Server details, including the hostname or server address provided by your webmail service. Input your full email address as the username and provide the correct password.
Next, enter the Outgoing Mail Server details, which are often similar to the incoming server. Ensure all information is accurate and tap “Next.”
Step 7: Complete the Setup
Once you’ve entered all the required information, tap “Save” or “Next” to complete the setup process. Your iPhone will verify and configure the settings, and your webmail account will be ready for use in the Mail app.
Conclusion:
Congratulations! You’ve successfully connected your webmail account to your iPhone, enabling seamless email management on-the-go. Enjoy the convenience of quick access to your webmail, ensuring you remain connected and responsive wherever life takes you. Simplify your email experience by effortlessly integrating webmail with your iPhone using this user-friendly guide.
Leave A Comment?