Introduction:
In today’s fast-paced digital world, staying connected is essential, and having your Plesk email account accessible on your Android phone ensures you’re always in touch. In this guide, we’ll walk you through the straightforward process of connecting your email accounts on Plesk to your Android device, bringing the convenience of email communication to your fingertips.
Step 1: Open Email Application on Your Android Phone
Begin by opening the default email application on your Android device. This application is often labeled as “Email” or “Mail,” depending on your device’s make and model.
Step 2: Choose “Add Account”
Within the email application, look for the option to “Add Account.” This is typically found in the settings menu or can be prompted when you first open the application. Select “Add Account” to start the setup process.
Step 3: Select “IMAP” or “POP3” as the Account Type
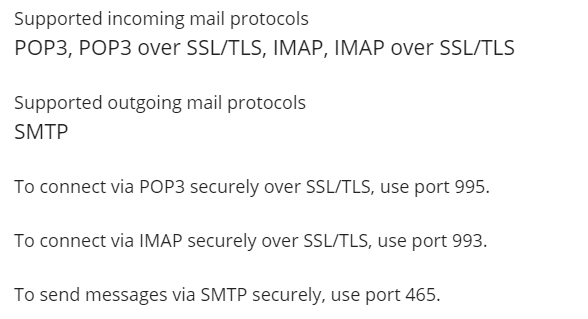
Plesk supports both IMAP (Internet Message Access Protocol) and POP3 (Post Office Protocol) for email retrieval. Choose the option that best suits your needs. IMAP is recommended for those who want to access their emails from multiple devices while POP3 downloads emails to a single device.
Step 4: Enter Your Email Account Details
Enter the required information, including your full email address and the password associated with your Plesk email account. Additionally, input the incoming and outgoing mail server details, which are usually in the format “mail.yourdomain.com.”
Step 5: Configure Incoming and Outgoing Server Settings
Ensure the correct server settings are configured for both incoming and outgoing servers. use 995 for POP3, and 993 for IMAP, while the outgoing server uses port 465.
Step 6: Choose Account Options
Select additional options such as synchronization frequency, whether to sync contacts and calendar, and the amount of past emails to sync. Adjust these settings based on your preferences.
Step 7: Complete Setup and Sync
Once you’ve entered all the necessary information, click “Next” or “Finish” to complete the setup. Your Android phone will now sync with your Plesk email account, and you can access your emails directly from your device’s email application.
Conclusion:
Congratulations! You’ve successfully connected your email accounts on Plesk to your Android phone. Enjoy the convenience of receiving and sending emails on the go, ensuring you stay connected with your communication hub anytime, anywhere. Simplify your digital life by bringing your Plesk email accounts to your fingertips with this easy-to-follow integration guide.
Leave A Comment?